The Azdo connection allows you to use Suivi to display Azdo work items in different views.
Overview
How it works
The connection between Suivi and Azure DevOps allows you to synchronize work items from an Azure DevOps project (often referred to as Azdo) to a Suivi board. This synchronization relies on various connection parameters, such as the organization and the Area Path of your project, to identify which work items should be transferred to the Suivi board. The information synchronized for each work item depends on the mappings defined between Suivi board attributes and Azdo attributes.
If a work item has 'Child' type relationships, it is also possible to synchronize the titles of child work items. This way, the list of children becomes visible in Suivi (but remains non-editable and without a direct link to Azdo).
Additionally, it is possible to create work items in Azdo from elements directly from the Suivi board. This feature allows you to prepare items on the Suivi board, then create them in Azure DevOps, either individually or through bulk synchronization.
For example, the Suivi board can be used to initiate a series of User Stories as part of studying a Feature in Azdo. Once these User Stories are created, they can be pushed directly into Azure DevOps, the reference tool for developers.
However, it is important to note that the rule for modifying items after synchronization remains unchanged: once a work item is synchronized, it becomes the property of Azdo, and all associated fields in the connection are no longer editable in Suivi. Modifications must then be made on the Azdo side.
What makes up an Azdo connection?
In a connection between Suivi and Azdo, only one type of work item can be synchronized per connection. However, it is possible to define multiple connections for the same board.
To establish the connection with an Azure DevOps project, the first piece of information required is your Personal Access Token (PAT), which serves as your access identifier to Azdo. This PAT has a maximum validity period of one year and can be created in your Azdo user settings.
In addition to this PAT, you need the information related to your project identification:
- Your organization
- Your area (area path)
Finally, the connection to Azure DevOps will allow you to define all the Azdo fields to synchronize with Suivi, knowing that it is entirely possible to synchronize only some of the fields from your board.
Synchronization principles
Synchronization is bidirectional, which means it is possible to transfer work items from Azdo to Suivi, just as Suivi can create new work items in Azdo.
However, be careful: when the item is created in Azdo, any modification of this item in Suivi becomes impossible for all synchronized fields (non-synchronized fields remain editable since they are owned by the Suivi board). In short, synchronization from Suivi is only possible if the work item does not exist in Azdo.
- Downstream synchronization (Azdo items flowing down to Suivi): creation and update of items
- Upstream synchronization (Suivi items flowing up to Azdo): creation of new work items only
Usage constraints
The connector between Suivi and Azdo has certain operational limitations that are important to keep in mind:
- Since the Work item is owned by Azdo, any field that has been synchronized will only be editable on the Azdo side.
- Only 'Child' type relationships are synchronized.
- Discussions, linked documents, and the history of a work item are not synchronizable (however, images in a Long Text type field are).
- Each connection only allows synchronization of a single work item type (except if it has children).
- Any element (and its children) initialized in the Suivi board must have the Suivi status corresponding to the New status in the Azdo project. Otherwise, creation on the Azdo side will be rejected. Check this information in the connection's field mappings.
Defining the board model based on Azdo data (Agile model)
Azdo provides synchronizable fields. However, you will note that some of them cannot be mapped to the corresponding attribute in Suivi but use a Text or Number type attribute (e.g., Priority = Number attribute and not Choice from a list, even though it is a list on the Azdo side).
Main supported fields and their equivalent in Suivi
| Azdo WorkItem Attribute | Suivi Item Attribute | Affected Work Item |
|---|---|---|
| Title | Text | All |
| Assigned to | User | All |
| Created by | User | All |
| Tags | Choice from a list. In this case, it is recommended not to create list values, or only those that do not exist in Azdo. Indeed, synchronization will handle creating the list values used by the work item (creating tags based on those synchronized). | All |
| Description | Long text | All |
| State | Choice from a list (and status mapping in connection settings) | All |
| Area path | Text (as this is a filter configured in the connection, it will be the same for all your synchronized items). | All |
| Iteration path | Text | All |
| Priority | Number | All |
| Severity | Text | Bug |
| Effort | Text | Feature |
| Story points | Number | User Story |
| Risk | Text | Epic, Feature, User Story |
| Business Value | Number | Feature |
| Time criticality | Text | Feature |
| Start date (without time) | Date | Feature |
| End date (without time) | Date | Feature |
| Due date (without time) | Date | Study |
| Value area | Text | All |
| Original estimate | Number | Task |
| Remaining | Number | Task |
| Completed | Number | Task |
| Child Work Items (Child relationship) | Milestones / Checklist (note: one attribute per child Work item type) | All |
| Parent Work Item (parent relationship) | Number (required parent item identifier) | User Story, Task, Study |
| Discussion | Not supported | x |
| Link to Work Items in Azdo | Connection (required field) | All |
Other system fields can also be synchronized. Refer to the Microsoft documentation.
Connect to an Azure DevOps board
Prerequisites
To set up the connection to Azure DevOps, you need to have your Azure DevOps personal access token.
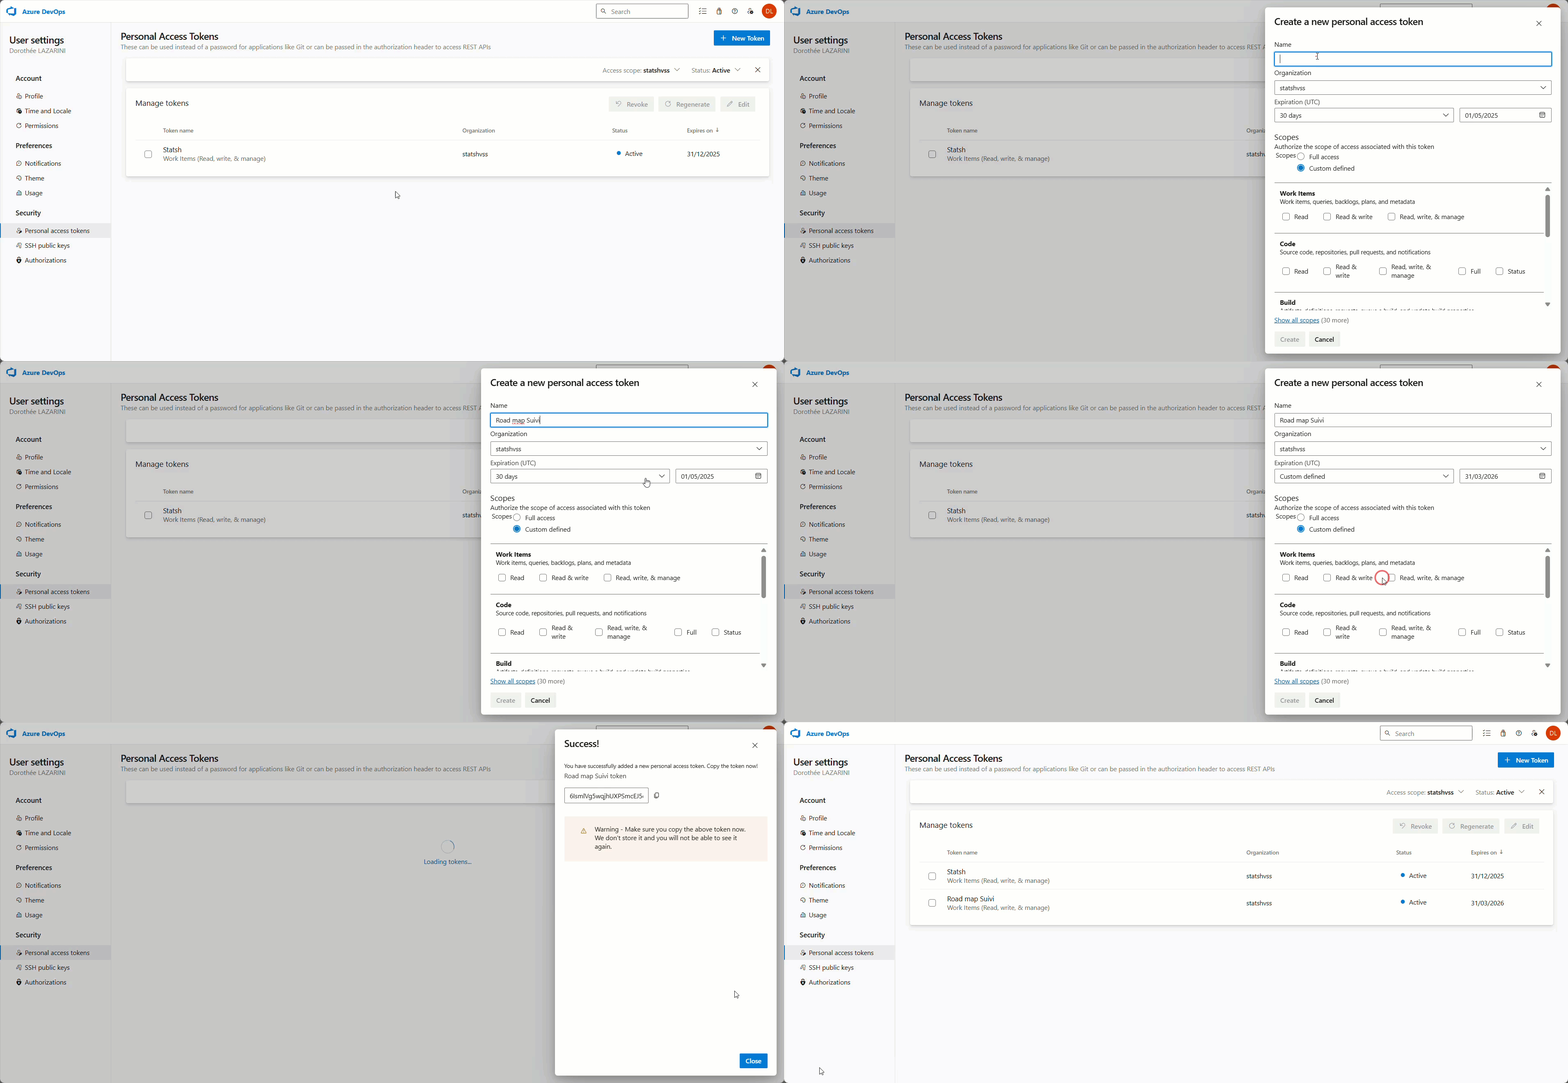
To create this token, proceed as follows:
- Click on User Settings > Personal Access Tokens at the top right in the Azure DevOps header.
- Click on New token.
- Enter a name and set the token expiration date.
- Check the Read, Read & write, and Read, write & manage boxes in the Work Items section before clicking Create.
- Copy your token. Warning! Once the window is closed, you will no longer be able to access your token.
Declare the Azure DevOps connection
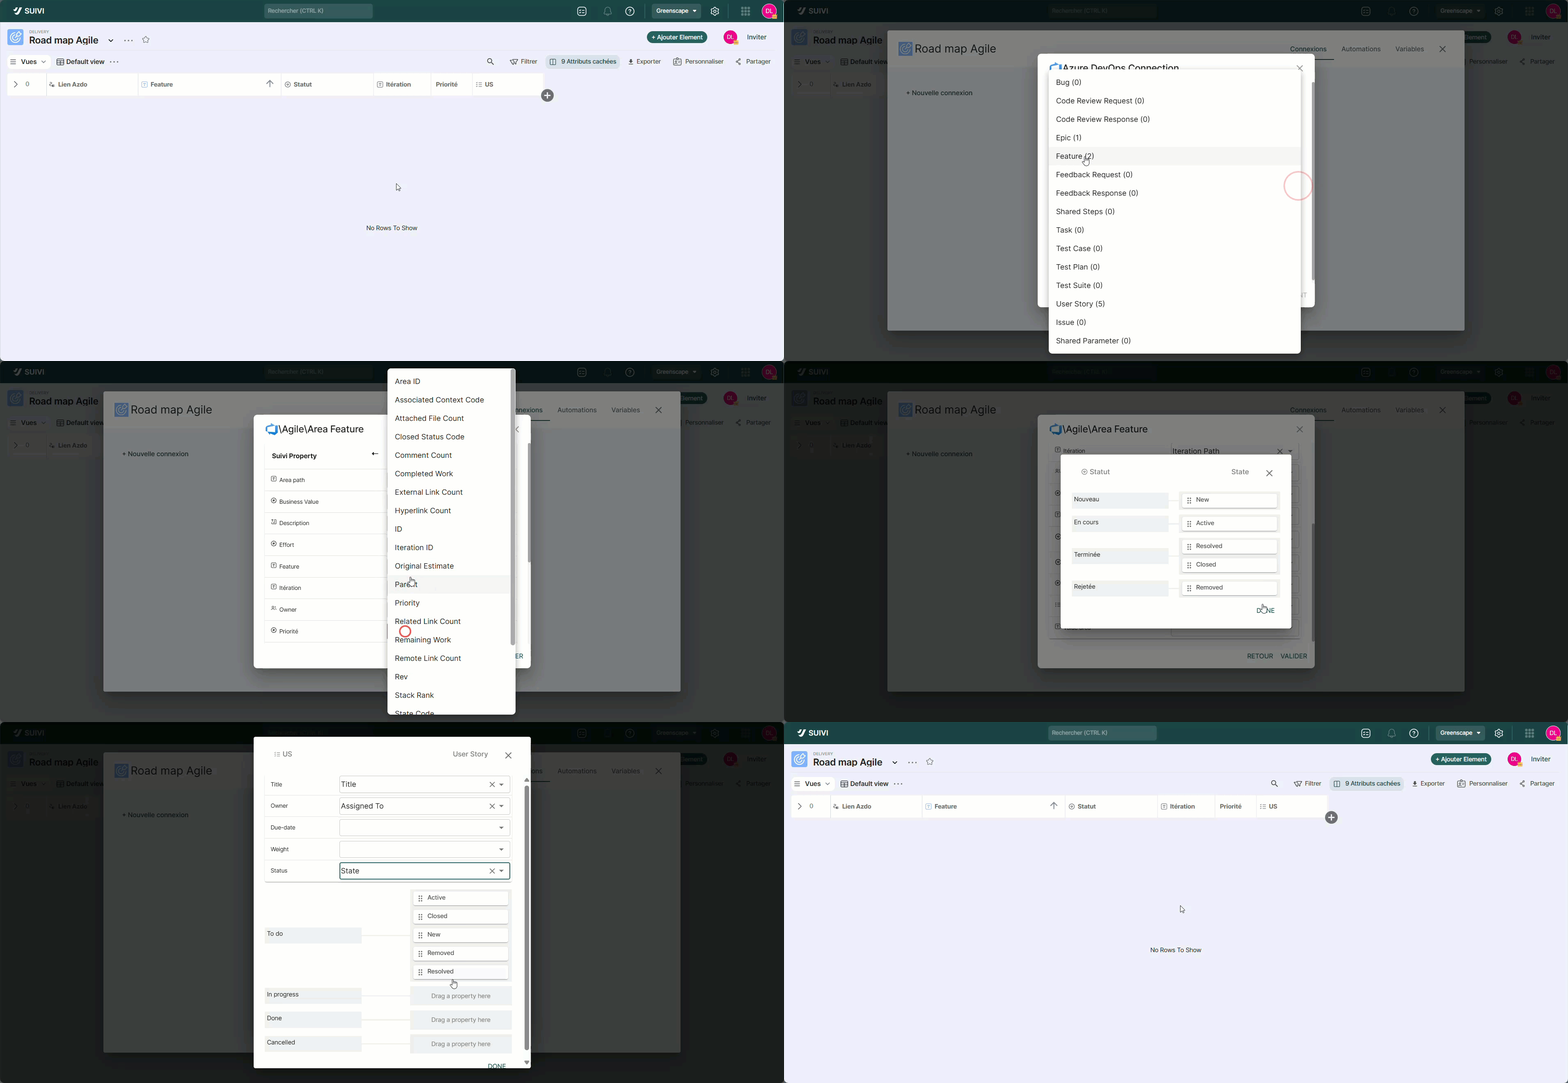
To connect to an Azure DevOps board, you need to declare the access parameters to Azdo and the field mapping between the two systems:
- Click on the … button of the board > Connectors.
- Click on New connection > Azure DevOps
- Enter the required information to access the board such as:
- The connection name in the Name field.
- Your Azdo personal token in the Personal Access Token field.
- The name of your organization indicated in the Azure DevOps URL such as https://dev.azure.com/Project Name/ …. This is the project name you must enter in the Organization field.
- Click Next.
- Choose the Azure project and area path you want to synchronize.The area path is a strict filter: all its sub-areas will not be considered during synchronization (e.g., if you choose Agile/area/area1, this will exclude any item with the area Agile/area or Agile/area/area+N).
- Choose the type of work items to synchronize from the list provided (a number after the work item will indicate the number of existing work items).
- If you want to optionally synchronize only the children of a specific work item, enter its Azdo identifier number and click Next. Note that if you use this setting, only the child items of this work item will be synchronized to Suivi and conversely, all items created from Suivi will be children of this work item during upstream synchronization (Suivi >> Azdo)
- Map the Suivi fields to the Azdo fields you want to synchronize. It is not mandatory to map all fields. Unmapped fields will remain editable and only visible in Suivi.
- If you have used Tags type fields, click the Configure button to map the list values to those of the Azdo field.
- Click Finish.
Synchronize data
Synchronize Azdo items to Suivi
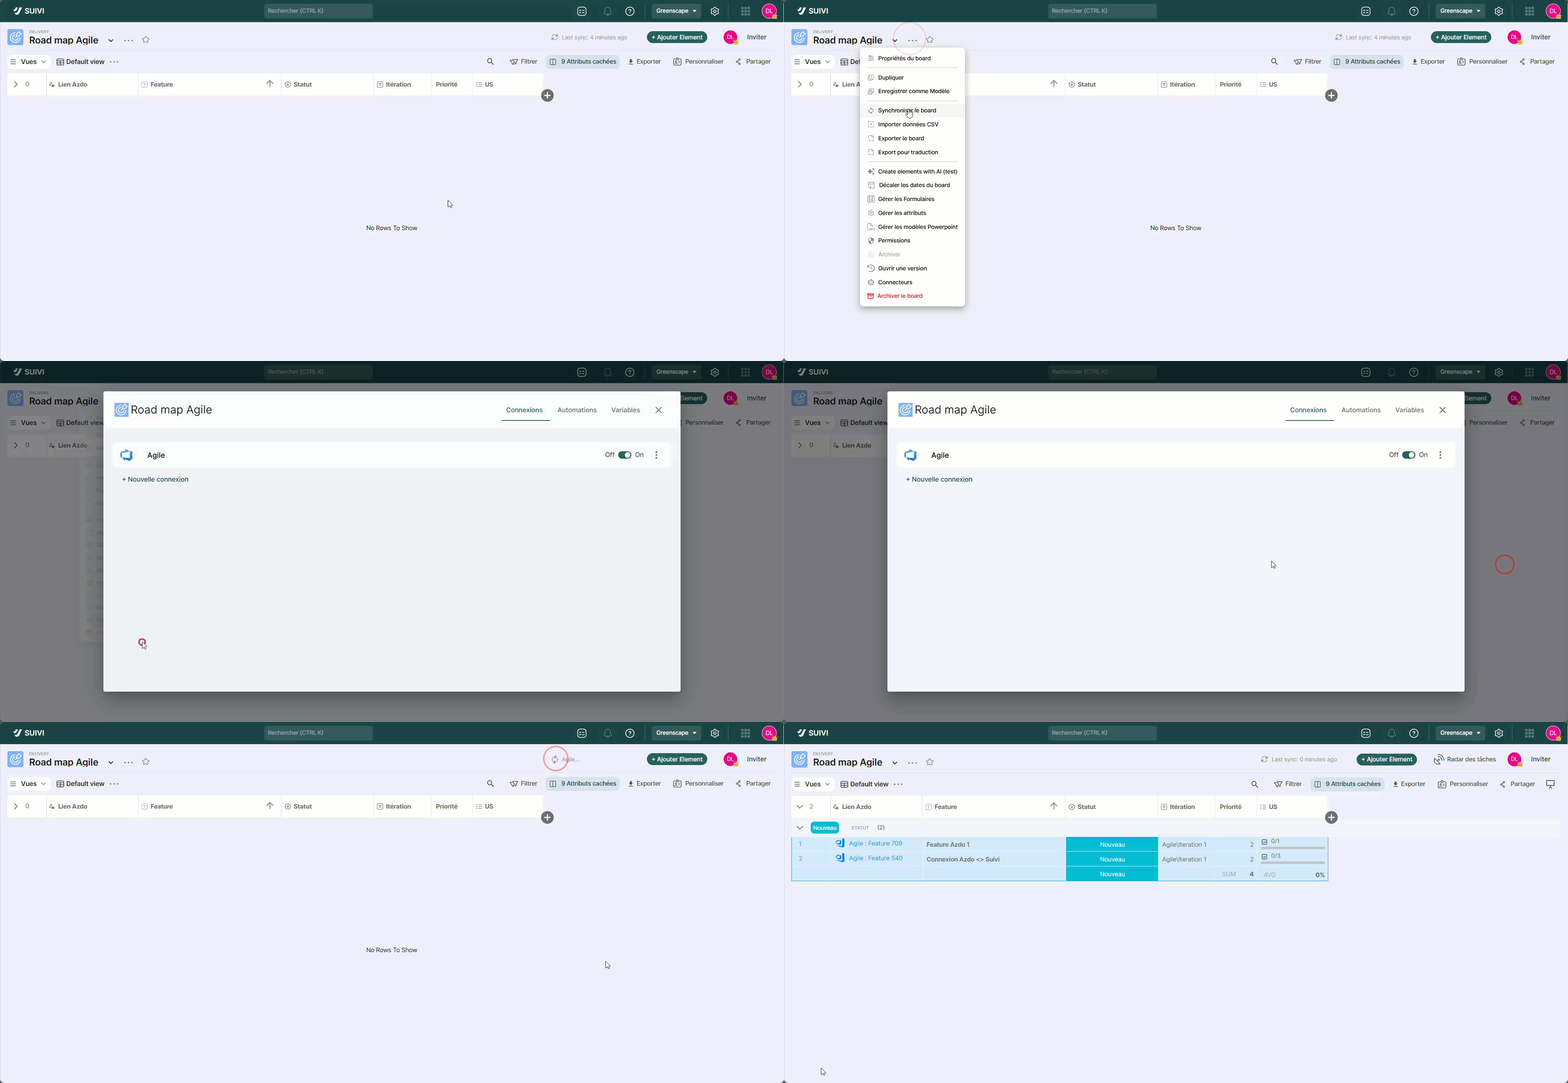
Once the connection is configured, you can start synchronizing items in your Suivi board. To do this, you have several ways to proceed:
- from the connection: by clicking the Kebab button > Sync board from the connection settings dialog,
- from the board context menu: click the Kebab button to the right of the board name > Sync board,
- from the sync button in the header.
Sync a new Suivi item to Azdo
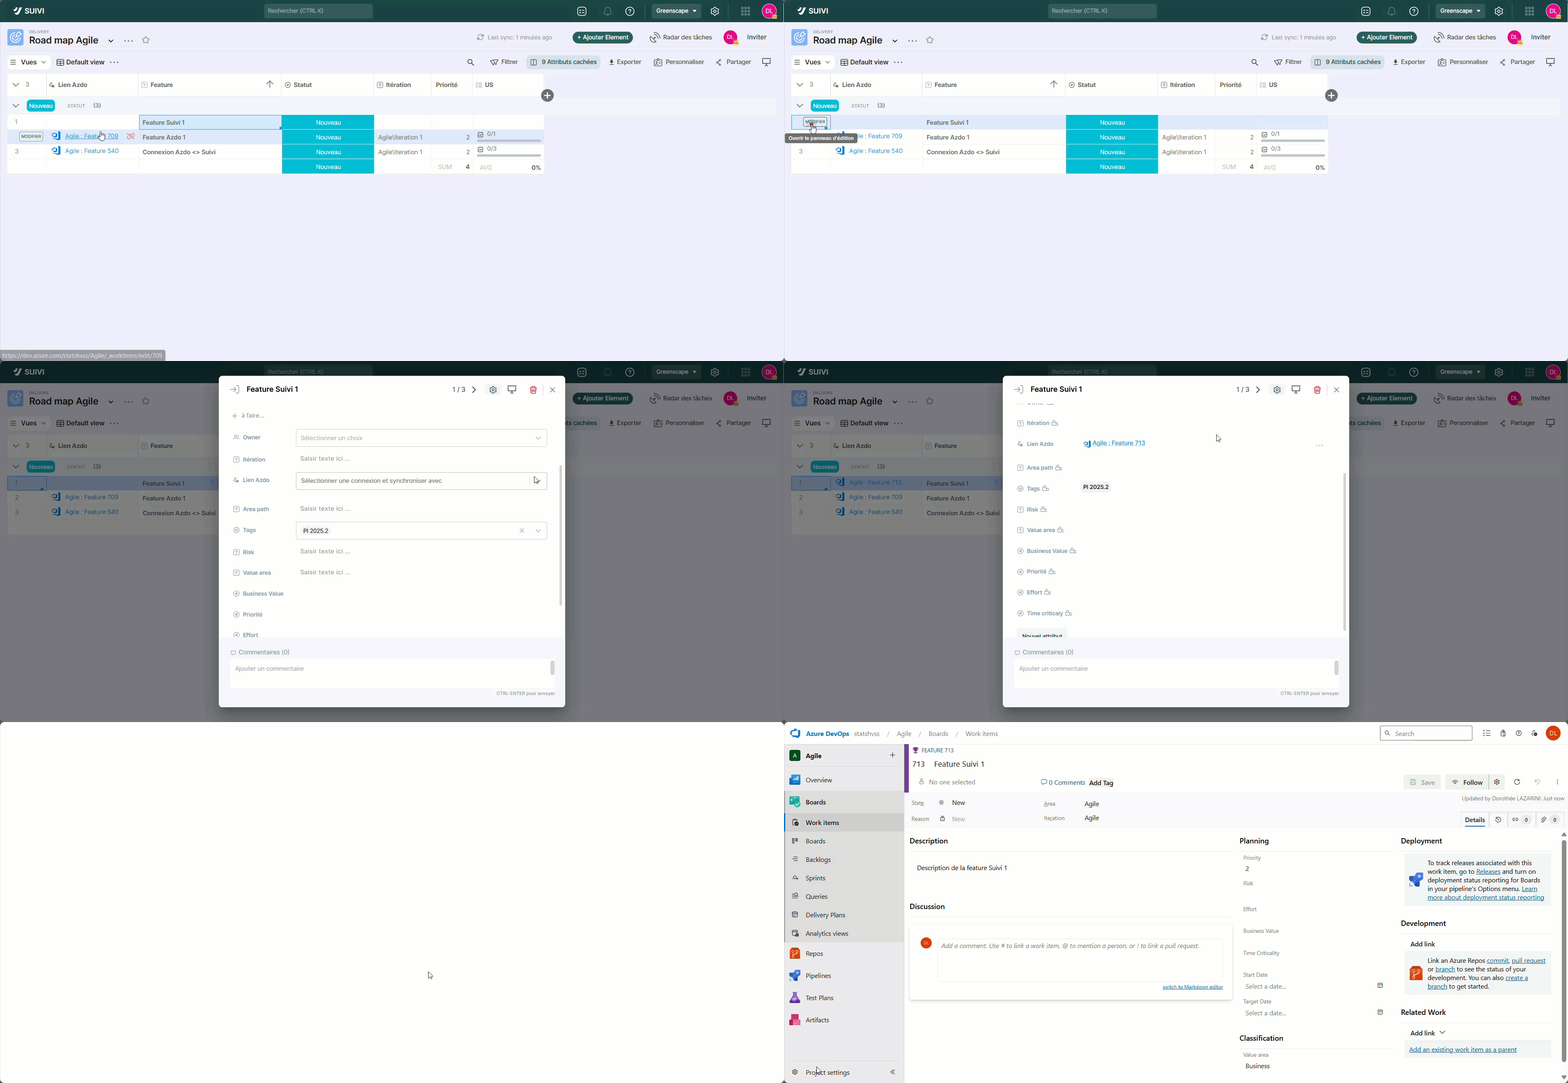
As mentioned previously, from a Suivi board, you can create items in the Azdo project. To do this, a row-level or multi-row synchronization function is available in the board's Table view. It's also possible to do this individually by directly editing the item (edit form).
To launch synchronization of an item to Azdo from the Table view:
- In the Table view, double-click on the Connection attribute cell of the desired item. A Synchronize item with menu appears.
- Choose the desired connection if there are multiple. The link to the Azdo work item appears in the cell. It has the form "Project: Workitem Type #Azdo".
To launch the synchronization of an item to Azdo from the item's edit form:
- Open the edit form.
- On the connection attribute, choose the desired connection if there are multiple. The link to the Azdo work item appears in the cell. It has the form "Project: Workitem type n°Azdo".
Delete an Azdo Link
When an Azdo link is created, it remains possible to delete it from the Suivi board. This can be useful if, for example, the synchronization did not work correctly, making the link unusable.
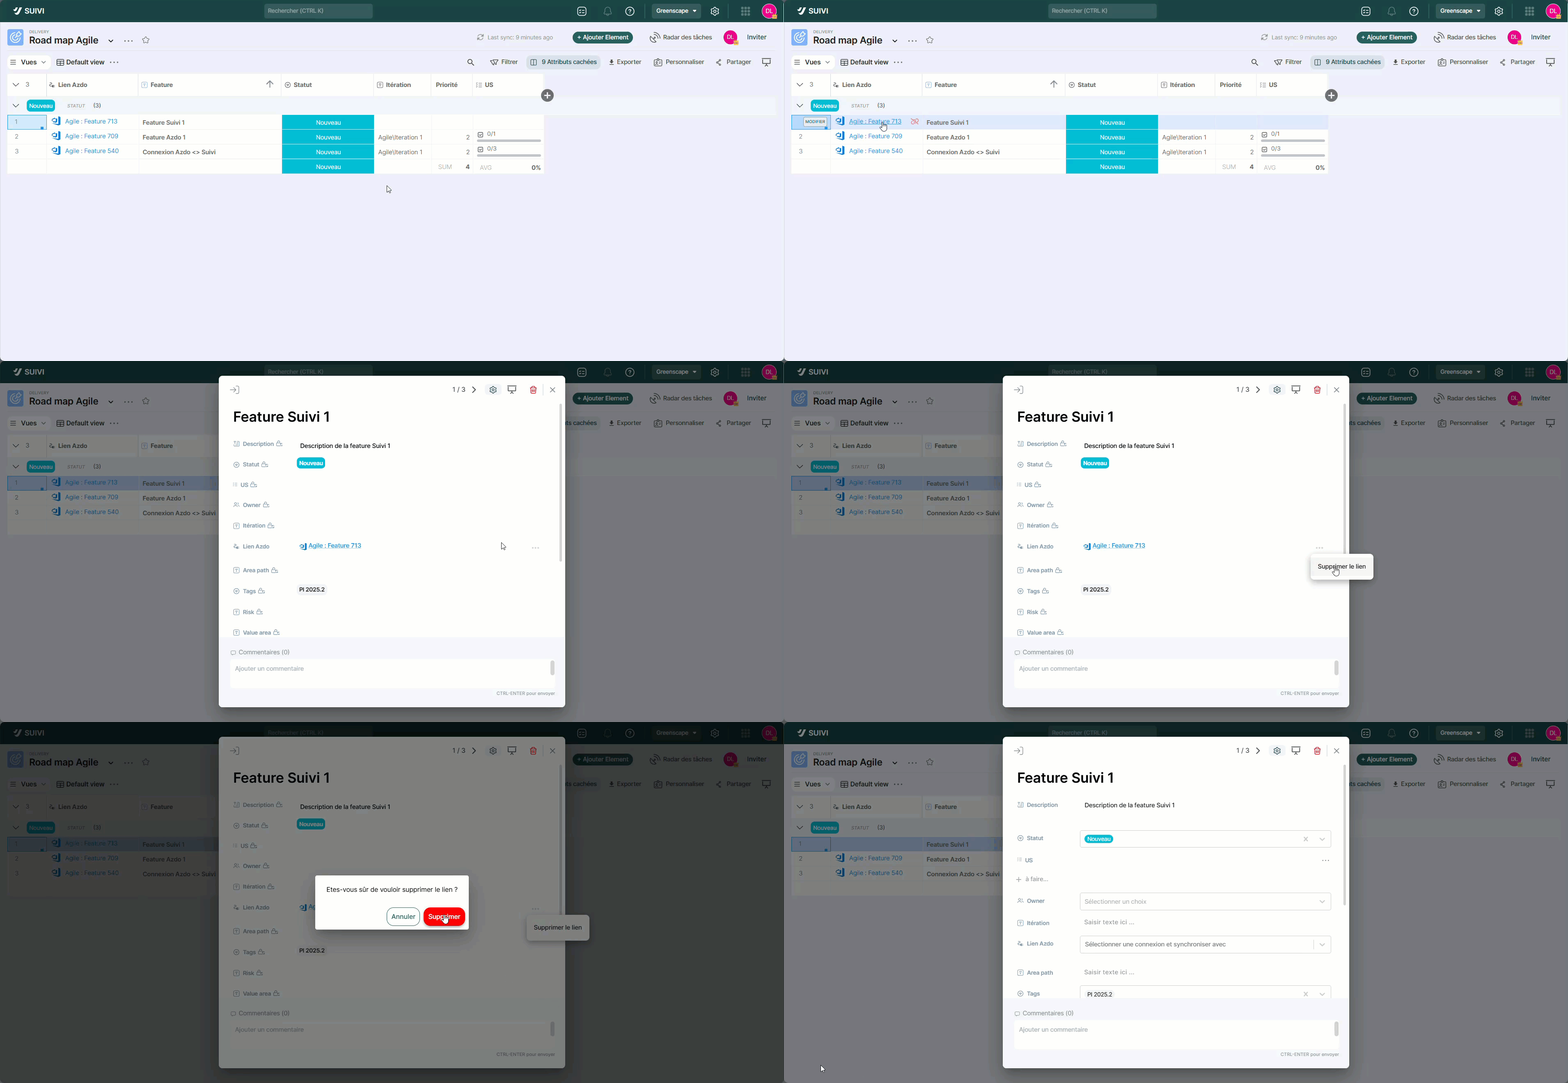
- To delete the link from the Table view, simply click on the red Broken Link icon that appears in the cell on hover.
- If you go through the item editing form, click the […] button of the Azdo link attribute.